
Pegboard
Intro
Pegboard is an excellent way to organize light to moderately heavy gym items, keeping them organized, and easily accessible.
Now the pegboard that I am talking out is the standard pegboard that you can get from most Big Box Hardware Stores. It is cheap, strong, and since it can be cut – with a saw – therefore it inherently has customizable sizes. It typically comes in 4’x8’ Sheets and 2’x4’ Sheets and will be a fraction of the cost of steel pegboard (which does a higher load capacity but that higher load capacity is overkill for most people).
Of course if you do want to explore prefabricated pegboards made out of other materials such as metal (and even plastic) – please consider using my Affiliate links down below to browse through those options.
Tutorial
Step 1: Measure the area you want to cover with pegboard
Step 2: Cut Pegboard to size
If you are using a circular saw cut with the white side (the Front side) DOWN. Doing so will prevent the circular saw’s deck from scratching up the front side of the pegboard as it traverses the length of the pegboard. If you are using a table saw you will cut with the white side UP. Doing so will prevent the top surface of the table saw from scratching up the front side of the pegboard as the pegboard is pushed through the saw blade.
You may need to amend the dimensions that you planned for in step 1, because you do not want to cut through (or too close to) a row of pegboard holes.
If you cut ON a row, that edge of your pegboard will not be straight (as I say in the video it will look like the edge of a piece of paper ripped out of a spiral notebook).

Further, if you cut too close to a row of holes, the structural integrity of the pegboard is compromised. The screws in this row/column can easily rip through the THIN edge.

You want to leave a nice fat edge. So try to cut in the center between the rows if possible.

Step 3: Cut Spacer Boards
I used 1”x2” Lumber (which has ACTUAL dimensions of 3/4” x 1.5”).
These spacer boards are necessary so that there is a gap between the surface of the wall, and the rear surface of the peg board. It is in this space that the pegboard hardware’s rear hooks will occupy.
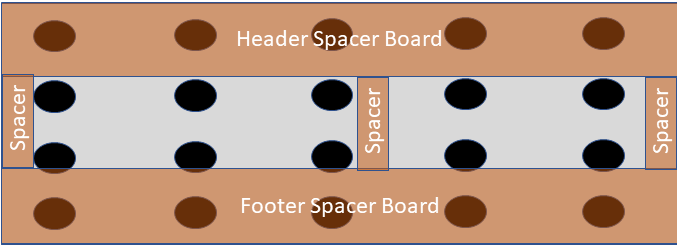
The header and footer spacer boards should be as long as your pegboard is long. The center spacer boards need to fill in the gap between the bottom edge of the header to the top edge of the footer.
This is how I did mine (see picture below) – simply because it was easier. You will notice that the 3 spacers in the middle sacrificed three columns of pegboard holes. As a result, I will not be able to hang any pegboard hardware here.

However, I could have done it like this (see picture below) – where I rip the 1x2 boards down to be about only ¾” wide. If I had done it this way, I would not have sacrificed any of those columns! I was just being lazy….but oh well!
Step 4: Paint Spacer Boards
This is optional. I wanted to obscure the spacer boards so that you could not see them through the pegboard’s holes. Further, the exposed edge on the sides/bottom of the finished product needed to be painted so that it matches the color scheme of my gym.
Step 5: Get Crazy with Enamel Paint
I had many cans of spray paint laying around - so I decided to turn the plain white pegboard into a work of art. I spray painted directly onto a paper plate, and then used the paper plate to drizzle/flick the enamel onto the pegboard. I really like the way it tuned out.
Step 6: Mark Stud Positions on the wall
Use your stud finder to locate the studs, and then mark those positions with a pencil.
Step 7: Mark Stud Positions onto the Header/footer Spacer Boards
Overlay the header and footer spacer boards (EXACTLY where they will be positioned) and then mark the stud positions onto the header/footer spacer boards with a pencil
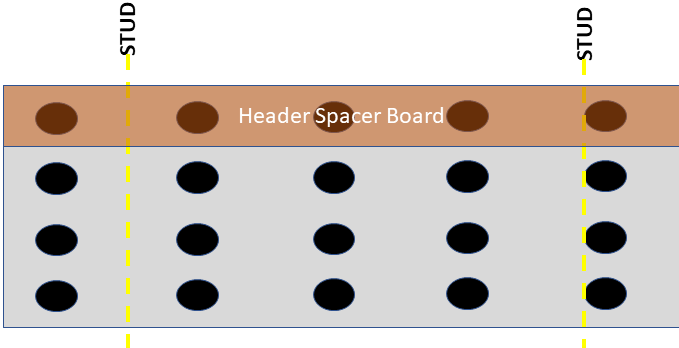
Step 8: Determine if pegboard holes are aligned with studs
If your Pegboard holes and the studs are aligned, You do not necessarily have to affix your spacer boards to the studs first. You CAN “temporarily” affix all your spacer boards to the wall (using some light-duty staples/nails to affix to a NON-stud location), and then run the screws through all layers (through pegboard AND spacer boards) and into the studs.
That being said, the rest of these instructions assume that your pegboard holes are NOT aligned with your studs.
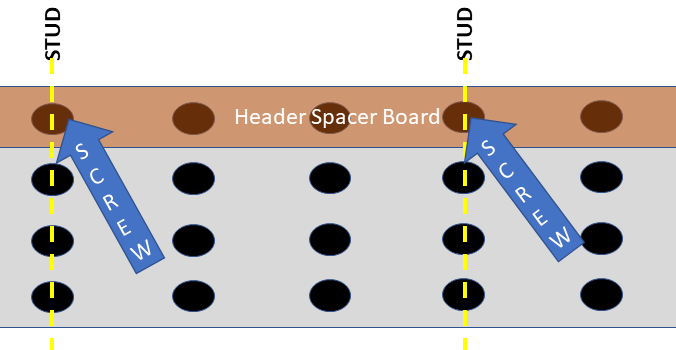
If your Pegboard holes and the studs are NOT aligned, You will have to affix your spacer boards to the studs first, and then affix the pegboard to the spacer boards.
Step 9: Drill Countersink holes on Spacer Boards
The Countersink holes will keep the head of the screws recessed in the wood of the spacer board so that the pegboard has a nice flat surface to butt up against.
For the header and footer you will want to drill these holes where you marked the position of the studs. For the three interior spacer boards, just make three countersink holes, one in the middle, and the other two about 1” from each end.
Step 10: Affix Spacer Boards to Walls
Like I said up above, I need to affix my header/footer spacer boards to the studs - (and the 3 interior spacer boards NOT into the studs) and THEN attach the pegboard to the spacer boards.
I used 2.5” long drywall screws to attach the spacer boards to the wall. I have seen others claim that drywall screws are too brittle to be used for hanging pegboard (they recommend construction/deck screws). If we were building a deck I would agree, but we aren’t. Drywall screws are plenty strong for this. Think about it - what do you think is going to fail first: A) the drywall screws or B) the pegboard holes? The thin Pegboard itself will certainly fail before a drywall screw will fail. So neener, neener, neener…
Ensure your header/footer are exactly where you want them, and then drive the screws into the countersink holes you made in step 9.
Step 11: Pre-Drill Through Pegboard Holes
Hold the pegboard up against the spacer board “frame.” Identify the positions where you will pre-drill. Be sure that where you drill is not too close to a pre-existing screw - or you will risk splitting the wood.
Step 12: Affix Pegboard to Spacer Boards
For this step I used 2.5” long drywall screws - WITH “Finishing Washers.” (Shopping link down below).
I placed 3 on the top, 3 on the bottom, and 3 in the middle.
ALL DONE! Now affix your pegboard hardware and start hanging up your equipment!
Shopping List
🛍 🛒SHOPPING LIST WHEN SHOPPING, PLEASE CLICK FIRST TO SUPPORT THE CHANNEL: By shopping via any of these links, I get paid a small commission which helps support the Club’s costs such as Web Hosting the website.
ALTERNATIVES:
WALL CONTROL Metal Pegboard: https://amzn.to/3SJUZKF
WALL PEG Plastic Pegboard: https://amzn.to/3SPICNn
Standard Pegboard Hardware:
Pegboard Hooks (50 Pc): https://amzn.to/3BZZGJJ
Pegboard MISC Kit (170 Pc): https://amzn.to/3CmWSHR
Pegboard Bins: https://amzn.to/3SO3OU2
Tools and Fasteners:
Tape Measure: https://amzn.to/3CSFnjk
Dewalt Compound Miter Saw: https://amzn.to/3AOTLGj
Dewalt Mitre Saw Stand: https://amzn.to/3KWpdXJ
Circular Saw: https://amzn.to/361rwcy
•Table Saw: https://amzn.to/3i8NuN8
Stud Finder: https://amzn.to/3dmXdkg
•Dewalt Drill DCD791 & Impact Driver DCF887 COMBO PACK: https://amzn.to/3Bn1prD
Countersink Drill Bit Set: https://amzn.to/3qI9VwY
Drill Bit Set: https://amzn.to/3CjjFnX
Level: https://amzn.to/3LUK3Yq
Finishing Washers: https://amzn.to/3dWCqEu
Drywall Screws: https://amzn.to/3RrraOb
Once you try this for yourself - be sure to let me know how it worked for you! Happy Lifting!
SHOUT IT OUT: If you Build this project and want to brag about it, please use the #DesignBuildLift hashtag so that I can feature your amazing creation on my social media to help inspire others!