Barbell Rack
Introduction
The DIY “Gun Rack” style of Barbell racks is a very common design. You can buy these gun racks, and they are not terribly expensive. Therefore, I think it only makes sense to DIY a barbell rack if you are going to “do it on the cheap.” Therefore, I purposefully, designed this barbell rack using ONLY 2x4s. I initially was going to use 4x4s for the “hooks” - but after adding up the cost of fasteners, 2x4s, and 4x4s - it started making less sense to take the DIY approach. However, then it occurred to me that if I only used 2x4s in the design - I could make it much cheaper.
DIY Tutorial:
Step 1: Determine Length and Position of Barbell Hooks
I made my barbell rack 80” long. This means I am mere inches away from the ceiling, and the bottom on the rack is resting on the floor. You don’t have to do it this way – but if I ever load this up with 12 barbells – I wanted to make sure that it was not putting too much weight on my studs. Therefore, I am letting the floor do most of the “heavy lifting.”
To determine the best hook position (hooking onto the barbell’s shaft or onto the barbell’s sleeves), use a stud finder to mark the stud positions, and then lay out your barbells along that wall. You will quickly see where you can/want to place the hooks with this method - on the shafts or the sleeves.
I decided to build mine so that the barbell sleeves will be placed on the hooks. There is far less work to do if you have the barbell shaft resting on the hooks – but since I wanted my rack to be centered on a relatively short wall – I chose to hang mine by the sleeves.
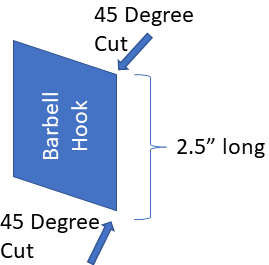
If you are hanging by the shaft you will cut 45-degree pieces that look like this.
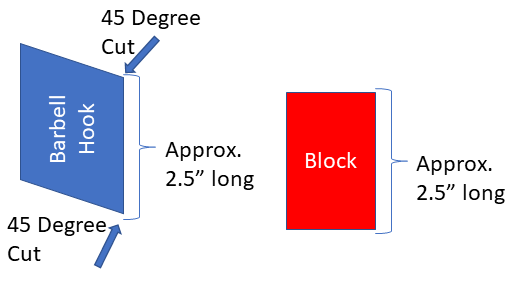
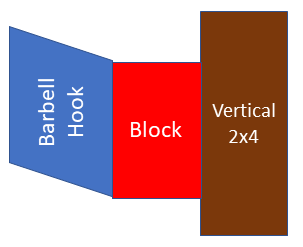
If you are hanging by the sleeves (or hanging an axle bar), you will need to additionally cut wooden blocks.
Step 2: Cut TWO 2x4s to Length
I cut both of mine to be 80” long.
Step 3: Cut Notch to Accommodate Wall’s Baseboards (If Necessary)
Since I am going all the way down to the floor and my wall has baseboards, I chose to cut out a notch on the rear-bottom of my long 2x4s. The baseboards fit perfectly in these notches – keeping both units snugly against the wall.
Step 4: Make a 45 Degree Cut at the “Top Front” End of both 2x4s
This step was completely done for aesthetics only. Completely optional.
Step 5: Cut 45 Degree Hooks
Make at least 2 per barbell. However, I would advise you to make 2-3 extra, just in case something goes wrong later in the process.
Step 6: Trim Top Edge of Barbell Hooks
This step is done so that we mitigate the hooks from getting chipped/Split if the barbell bangs into the sharp edge.
In the video I said 1/8” should be trimmed. What I should have said was AT LEAST 1/8”. You can cut off way more than 1/8” if you wish. Just leave enough so that your barbells don’t roll off the rack!
Step 7: Cut Blocks for Barbell Hooks.
Again these are only needed if you are hanging an Axle Bar or hanging your barbells by the sleeves.
Step 8: Glue the Blocks to the 45 Degree Hooks.
Of course you only have to do this step if you had to complete step 7.
Be sure that trimmed edge (Step 6) is pointed upwards – don’t glue the hooks upside down!
Make sure the glue is completely dry before proceeding.
Step 9: Sanding
This is optional – but highly suggested. You want this to look nice – and you want to prevent splinters.
Step 10: Drill Countersunk holes in Barbell Hooks
Of course you could have done this earlier in the process (before gluing) – but I think it is easier to do it at this point in the process.
This step is completely optional. My reasoning for doing this step is that I wanted to mitigate the risk of scratching my barbell. Having the heads of the metal lag screws sticking out will eventually cause some unnecessary scratches on your barbells. By drilling a countersunk holes – that risk is eliminated.
I used a Forstner bit for this step.
Step 11: Determine Countersunk hole position in Long 2x4
Again – I don’t want to unnecessarily scratch my barbell. So I chose to drill countersunk holes so that the heads of the lag screws that will be used to affix the barbell rack to the wall studs – will be recessed as well.
I know that one day I may want to hang up to 12 barbells on my rack – so I laid out all 12 hooks (using a 3.5” 2x4 piece as a spacer) on ONE long 2x4 to determine where I should place these lag screws. I made sure that my drill will fit in between the hooks to make affixing to the studs as easy as possible.
Step 12: Drill Countersunk holes on long 2x4s
Again – this step is completely optional. I used a Forstner bit for this hole as well.
Step 13: Affix Hooks (with glued on Blocks) to 2x4s
MAKE SURE YOU PRE-DRILL sufficiently. I did pre-drill – but I must admit – initially the bit I used to pre-drill was not large enough. Therefore, when I drove the leg screws through the first hook/block – the first one split and was ruined. Luckily I made extra hooks (this was cut out of the video because the video was getting too long). Therefore, I pre-drilled all of the hooks/blocks AGAIN with a larger bit (going all the way through the hooks and Blocks) – and I experienced no further splitting of wooden hooks/blocks.
I used a 3.5” spacer block to ensure consistent spacing of all the hooks/blocks.
I did not use glue for this step. If any hooks/blocks ever split – I want to be able to easily replace them be unscrewing the damaged block – and screwing a new one on.
Step 14: Paint/Stain
I painted – but staining is probably best. Staining seeps into the grain of the wood and therefore will keep things looking nicer for longer. However, I just like the look of paint better in my gym. So there!
Step 15: Affix Barbell Rack to Wall Studs
I used a stud finder to identify the stud locations, and then drove the lag screws directly into the center of the wall studs.
I used a level to make sure things were not hung crooked and my used Dewalt Impact Driver to drive in the lag screws.
I also PRE-DRILLED these holes – to ensure that the wood does not split.
That’s it. It was a fun project, and it turned out better than I had expected. I love it!
Shopping List
PLEASE CLICK FIRST TO SUPPORT THE CHANNEL: By shopping via any of these links, I get paid a small commission which helps support the Club’s costs such as Web Hosting the website.
Alternatives:
Rep Fitness Barbell racks: https://bit.ly/3MzhmAx
Yes4All Barbell rack: https://amzn.to/3T8GeBN
Power Tools:
Dewalt Compound Miter Saw: https://amzn.to/3AOTLGj
Dewalt Mitre Saw Stand: https://amzn.to/3KWpdXJ
Circular Saw: https://amzn.to/361rwcy
Table Saw: https://amzn.to/3i8NuN8
Dewalt Drill DCD791 & Impact Driver DCF887 COMBO PACK: https://amzn.to/3Bn1prD
Misc Tools:
Tape Measure: https://amzn.to/3CSFnjk
Stud Finder: https://amzn.to/3dmXdkg
Drill Bit Set: https://amzn.to/3CjjFnX
Level: https://amzn.to/3LUK3Yq
Rafter Square: https://amzn.to/3Tk8SQ6
Forstner Bit Set: https://amzn.to/3TkWqj5
Clamps: https://amzn.to/3D0Soap
Fasteners:
4” Lag Screws: https://amzn.to/3yE3rDK
2 7/8” Lag Screws: https://amzn.to/3rSEMHH
MISC:
Wood Glue: https://amzn.to/3MBix2K
Paint: https://amzn.to/3g8svfR
Once you try this for yourself - be sure to let me know how it worked for you! Happy Lifting!
SHOUT IT OUT: If you Build this project and want to brag about it, please use the #DesignBuildLift hashtag so that I can feature your amazing creation on my social media to help inspire others!


